Actions
Motivation
Proper alert management can help security practitioners make informed decisions about their codebase. However, security alerts can cause fatigue if acting on them isn’t possible. Postee, an open source security alert management tool, helps mitigate some of those concerns. It enables teams to define routes and rules by which alerts are handled and redirected to
User Stories
In a typical Postee setup, users can configure the tool to receive events from a variety of sources over a webhook. This allows for ease of use in existing environments. Furthermore, users can configure Postee to process these incoming events and, based on logic defined via Rego rules, send them to different actions.
As a Postee User
-
I want, to be able to remove a vulnerable image from my cluster upon a Trivy scan
So that, I can keep such images unavailable for deployment. -
I want, to ship Tracee security notification logs from my node when events are detected
So that, I can build a timelog for forensics purposes. -
I want, to be able to add labels to my deployments when Starboard detects a vulnerable image in my cluster
So that, I can effectively tag my resources.
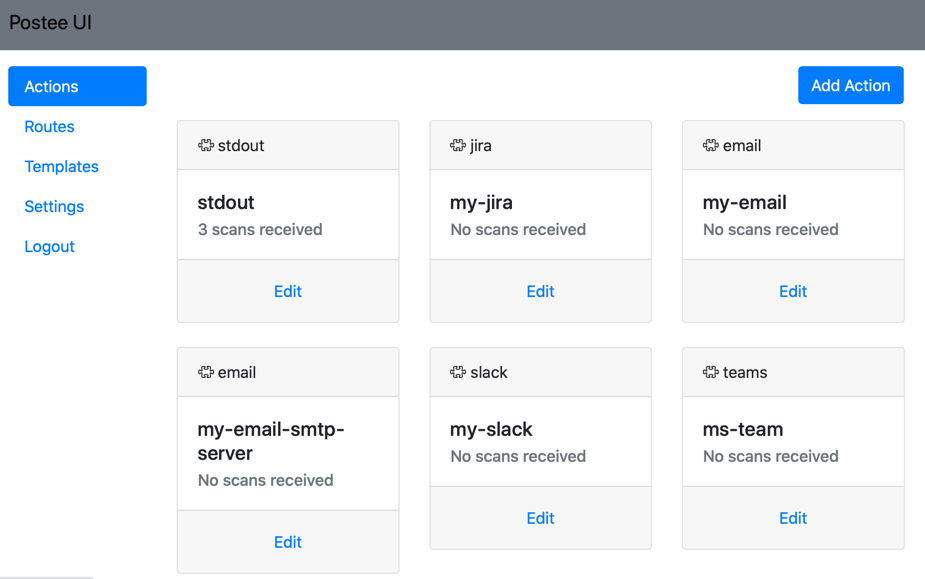
Actions are remote services that messages should be sent to. Each action has two mandatory fields, which are 'name' and 'type'.
| Key | Description | Values | Example |
|---|---|---|---|
| name | Unique name of the action. This name is used in the route definition. | Any string | teams-action |
| type | The type of the action | You can choose from the following types: email, jira, slack, teams, webhook, splunk, serviceNow |
Tip
Depending on the 'type', additional parameters are required.
Jira
Follow these steps to set up JIRA integration:
- Get a new token for user:
- Login to Jira Cloud. Go to the user profile API tokens (JIRA Cloud users can find it here).
- Click on the Create API Token. A new API token for the user is created.
- Login to Jira Server/Data center Select your profile picture at top right of the screen, then choose Settings > Personal Access Tokens. Select Create token. Give your new token a name. Optionally, for security reasons, you can set your token to automatically expire after a set number of days. Click Create. A new PAT for the user is created.
- Fill jira action in cfg.yaml:
- Jira Cloud:
- User: your email.
- Password: your API token.
- Jira Server/Data center:
- User: your UserName.
- Password: your Password.\ or
- Token: your Personal Access Tokens.
- Jira Cloud:
| Key | Description | Values | Required |
|---|---|---|---|
| url | Jira project url | Yes | |
| project-key | The JIRA project key | Yes | |
| user | Jira user. Use email for Jira Cloud and UserName for Jira Server/Data Center | Yes | |
| password | User's password. API token can also be used for Cloud Jira instances. | No | |
| token | User's Personal Access Token. Used only for Jira Server/Data Center | No | |
| board | JIRA board key | No | |
| priority | ticket priority, e.g., High | No | |
| assignee | comma separated list of users (emails) that will be assigned to ticket, e.g., ["john@yahoo.com"]. To assign a ticket to the Application Owner email address (as defined in Aqua Application Scope, owner email field), specify ["<%application_scope_owner%>"] as the assignee value | No | |
| issuetype | issue type, e.g., Bug | No | |
| labels | comma separated list of labels that will be assigned to ticket, e.g., ["label1", "label2"] | No | |
| sprint | Sprint name, e.g., "3.5 Sprint 8" | No |
For Jira you can also specify custom fields that will be populated with values.
Use the unknowns parameter in cfg.yaml for custom fields.
Under the unknowns parameter, specify the list of fields names to provide value for. Field name can contains spaces.
Possible options for getting the field name:
Get field name from Jira UI
- Move to your jira.
- Navigate to Settings(
 ) > Issues > Custom fields under the Fields section:
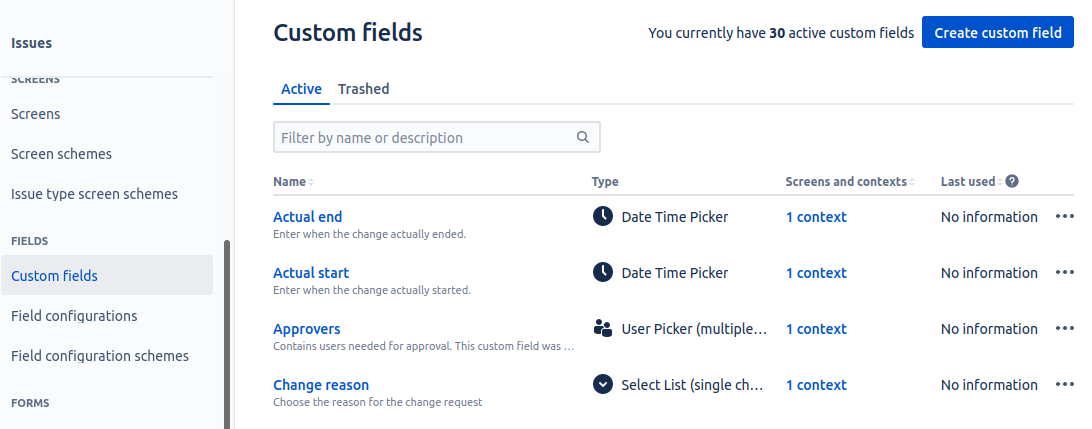
- Click on the required field.
- Get value from Name field.
Get field name from Jira REST API
- Get all Jira fields according to instructions
- Find needed field:
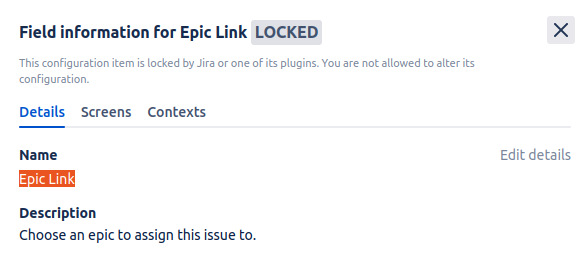
 ...
     "id": "customfield_10014",
     "key": "customfield_10014",
     "name": "Epic Link",
     "untranslatedName": "Epic Link",
     "custom": true,
     "orderable": true,
     "navigable": true,
     "searchable": true,
     "clauseNames": [
       "cf[10014]",
       "Epic Link"
     ],
     "schema": {
       "type": "any",
       "custom": "com.pyxis.greenhopper.jira:gh-epic-link",
       "customId": 10014
     }
   },
 ...
Example of using the unknowns parameter in the cfg.yaml file:
unknowns:
     Epic Link: "K8S-1"
Tip
You can add "-numeric-field", "-multiple-value", "multiple-line-text-field", "-date-time-picker" and "-field-url" as suffix to the custom field name, to specify what is the field type.
For example:
unknowns:
     mycustom: "this is a text custom field"
     mycustom-numeric-field: 123
     mycustom-multiple-value: 1,2,3
     mycustom-multiple-line-text-field: "text \n moretext"
     mycustom-date-time-picker: 2014-04-11T12:14:26.880+0400
     mycustom-url: https://tour.golang.org/moretypes/7
Email
| Key | Description | Values | Required |
|---|---|---|---|
| use-mx | Whether to send the email as an SMTP server or a client. Specify 'true' if you would like to send email as an smtp server, in this case you don't need to provide user, password, host and port. | true, false | |
| user | if auth supported. User name (usually email address) | No | |
| password | if auth supported. Password | No | |
| host | SMTP host name | Yes | |
| port | SMTP port | Yes | |
| sender | Sender's email address | Yes | |
| recipients | Recipients (array of comma separated emails), e.g. ["john@yahoo.com"]. To send the email to the Application Owner email address (as defined in Aqua Application Scope, owner email field), specify ["<%application_scope_owner%>"] as the recipients value | Yes |
Slack
Getting the Slack webhooks Create a Slack Custom App.
Copy webhook url to the Postee config
| Key | Description | Values |
|---|---|---|
| url | Slack WebHook URL (includes the access key) |
MS Teams
Open your Microsoft Teams client. Click on the "..." near the channel you would like to send notifications to.
Choose "Connectors". The connectors window will open. Look for the "Incoming Webhook" connector (it is under the "All" category).
Click "Add" near the Incoming Webhook connector. Click "Add" again. Provide a name and click "Create".
You will be provided with a URL address. Copy this URL and put it in the cfg.yaml.
| Key | Description | Values |
|---|---|---|
| url | MS Teams WebHook URL |
Splunk
You will need to care about an HTTP Event Collector in Splunk Enterprise or Splunk Cloud.
Tip
This can usually be found in the Splunk console under "Settings -> Data Inputs -> HTTP Event Collector -> Add New".
Once you create an HTTP Event Collector you will receive a token. You should provide this token, together with the Splunk HTTP Collector URL, as part of the cfg.yaml settings.
| Key | Description | Values | Required |
|---|---|---|---|
| token | The Splunk HTTP event collector token | Yes | |
| url | URL to Splunk HTTP event collector (e.g. http://server:8088) | Yes | |
| size-limit | Maximum scan length, in bytes. Default: 10000 | 10000 |
ServiceNow
| Key | Description | Values | Required |
|---|---|---|---|
| user | ServiceNow user name | Yes | |
| password | User API key / password | Yes | |
| instance | Name of ServiceNow Instance (usually the XXX at XXX.servicenow.com) | Yes | |
| board | ServiceNow board name to open tickets on. Default is "incident" |
Nexus IQ
| Key | Description | Values | Required |
|---|---|---|---|
| user | Nexus IQ user name | Yes | |
| password | Nexus IQ password | Yes | |
| url | Url of Nexus IQ server | Yes | |
| organization-id | Organization UID like "222de33e8005408a844c12eab952c9b0" | Yes |
OpsGenie
Set up OpsGenie and get a token
- Go to your Opsgenie and select Teams from menu.
- Select your team to access your team dashboard.
- Select Integrations from left navigation.
- Select Add Integration.
- Select API Integration.
- Copy
API Key. - When done with all configurations, select Save Integration to enable the integration.
See more details here: Set up an integrated tool for Opsgenie.
Caution
Postee requires an API key from an API integration. This can be added under the Settings -> Integrations tab. Or it can under a team's Integrations tab.
If the integration assigns an alert to a team, it can only create alerts for that team.
An API key from the API Key Management tab will produce an HTTP 403 error. This API Key is valid but cannot create alerts as it lacks necessary permissions.
| Key | Description | Values | Required |
|---|---|---|---|
| token | an API key from an API integration | Yes | |
| user | Display name of the request owner. | No | |
| assignee | Comma separated list of users that the alert will be routed to send notifications | No | |
| recipients | Comma separated list of users that the alert will become visible to without sending any notification | No | |
| priority | Specify the alert priority. Default is "P3" | "P1" "P2" "P3" "P4" "P5" | No |
| tags | Comma separated list of the alert tags. | No | |
| alias | Client-defined identifier of the alert. | No | |
| entity | Entity field of the alert that is generally used to specify which domain alert is related to. | No |
Exec
| Option | Usage | Required |
|---|---|---|
| env | custom environment variables to be exposed in the shell of the executing script | No |
| input-file | custom shell script to executed | Yes |
| exec-script | inline shell script executed | Yes |
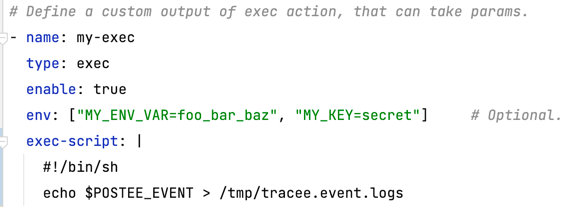
The Exec Action also internally exposes the $POSTEE_EVENT environment variable with the input event that triggered the action. This can be helpful in situations where the event itself contains useful information.
Below is an example of using $POSTEE_EVENT. It uses the inline exec-script script:
HTTP
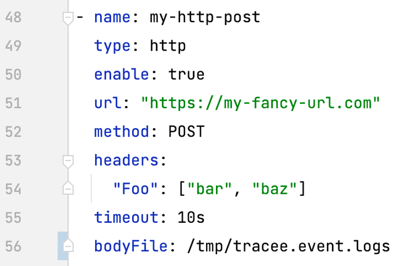
| Option | Usage | Required |
|---|---|---|
| URL | URL of the remote server | Yes |
| Method | e.g., GET, POST | Yes |
| Headers | custom headers to send | No |
| Timeout | custom timeout for HTTP call | No |
| Bodyfile | input file for HTTP post body | No |
Kubernetes
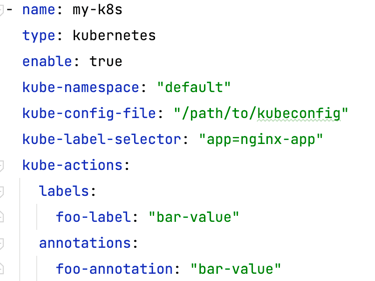
| Option | Usage | Required |
|---|---|---|
| kube-namespace | Kubernetes namespace to use. | Yes |
| kube-config-file | Path to .kubeconfig file | Yes |
| kube-label-selector | if specifying labels or annotations. | Yes |
| kube-actions | key-value pair of labels and annotations Labels must be added via "labels" key and Annotations via "annotations". |
No |
Docker

| Option | Usage | Required |
|---|---|---|
| docker-image-name | Image name of the docker image. | Yes |
| docker-cmd | Command to run inside the docker image. | Yes |
| docker-env | Environment variables to set in the container. | No |
| docker-network | Connect the action container to the specified network. | No |
| docker-volume-mounts | *Volume mounts present inside the container. * If you have specified volume mounts, you also need to pass them through into the postee docker container |
No |
Note
When running Postee in a Docker container, it is required to mount the Docker socket within the Postee container to be able to spin up Docker Action container instances. This can be done as follows:
docker run --rm --name=postee --group-add $(stat -c '%g' /var/run/docker.sock) -v /var/run/docker.sock:/var/run/docker.sock -v /path/to/cfg.yaml:/config/cfg.yaml -e POSTEE_CFG=/config/cfg.yaml -e POSTEE_HTTP=0.0.0.0:8084 -e POSTEE_HTTPS=0.0.0.0:8444 -p 8084:8084 -p 8444:8444 aquasecurity/postee:latest
Tip
If you have specified volume mounts for a docker container and use Postee in a docker container as well, remember to mount them within the Postee container as well:
docker run --rm --name=postee --group-add $(stat -c '%g' /var/run/docker.sock) -v /var/run/docker.sock:/var/run/docker.sock -v /path/to/cfg.yaml:/config/cfg.yaml -v /my/custom/volume:/my/custom/volume -e POSTEE_CFG=/config/cfg.yaml -e POSTEE_HTTP=0.0.0.0:8084 -e POSTEE_HTTPS=0.0.0.0:8444 -p 8084:8084 -p 8444:8444 aquasecurity/postee:latest
Generic Webhook
| Key | Description | Values |
|---|---|---|
| url | Webhook URL | |
| timeout | Webhook timeout |
Tip
The generic webhook action can be used for sending Postee output to any endpoint that can receive a request. You can find some interesting examples as part of the Postee Blueprints